Part 2: Travel Tips: RVing and Camping Safety
Part 2: Travel Tips: RVing and Camping Safety
By Jeannette and Dan Dudek
Things You Should Know When Your Travels Involve Camping and Hiking!
Part 2: Travel Tips: RVing and Camping Safety
If you do RV or Base Tent camping, you should be aware of the basics to keep yourself and your travel companions safe; and if an injury happens, what to do to properly treat the person.
This article explains the basic survival situations most likely to be encountered by a day-hiker; and is not intended to be a complete survival manual for the cross country backpacker.
To allow you to easily reference items, bullet points are used for your convenience throughout this article. Narrative explanations are provided to help you better understand many items.
Communication
- Consider installing in your RV or Camper a CB Radio
- Carry with you when you hike or bike:
- Cell phone
- Two-way radio (especially useful if one person wants to hike on his/her own, i.e. leave the other radio with a partner set to the agreed station number)
- Whistle (always), three blasts with whistle indicate you need help
- Leave an itinerary with a relative or close friend; arrange for a check-in schedule; provide local numbers of the campground you expect to be staying (along with any reservation numbers or site assignments you may have)
Trails
- The first 100 yards of a trail are prone to locations for being attacked (muggers, thieves and other such criminals prefer to remain in close proximity to their cars for a quick get-a-way)
- Avoid any area that appears not quite right; backtrack or go around
- Stay on the trail, do not take short-cuts
- Carry trail map, whistle, compass, first aid kit, hat and walking stick; along with water and some snack food
- Optional: handheld GPS, two-way radio, cell phone, emergency poncho, insect repellent, insect head net, water purification tables
First Aid
- Have large First Aid Kit in RV or tent
- Keep a First Aid Manual
- Read the manual over a period of time
- Have smaller First Aid Kits for hiking, biking, etc.
- Be sure to include: sanitized wipes, disinfectant, Band-Aids, gauze pads & tape, wrap for sprain or for use as a tourniquet, antacid tablets, and aspirins (chew one if think you are having a heart-attack)
- Keep matches and candles in all your First Aid Kits
- Keep some water purification tables in all your First Aid Kits
- Replenish and Refresh the items periodically
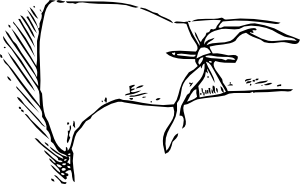
Tourniquet
Note: Understand that a person can survive a few minutes without breathing, but can bleed to death in less than a minute. If blood is squirting from a person with every heart-beat, it is essential you stop the bleeding by either direct compression, putting pressure on the artery supplying the blood to the wound, or by applying a tourniquet. You need to act fast and know how to apply a tourniquet if you are engaging in any outdoor activity. Once a tourniquet is applied, it should be left on tight and not loosen periodically.
To apply a tourniquet (shown to the right), wrap something around the arm or leg about an inch wide (folded handkerchief, cut shirt sleeve, pants leg, belt, rope, etc.) and place a couple of inches above the wound, i.e. between the wound and the heart; tie with a half a square knot; insert a stick, pencil, branch or similar object; and finish tying the square knot; turn the stick until the bleeding stops; use another piece of cloth wrapped around the arm or leg and use it to secure the stick, i.e. keep the stick tightly in place to keep the blood flow stopped.
Emergency Kit Essentials
- A couple of large clear plastic bags
- Several spring loaded clothespins
- Water purification tables
- Several yards of duct-tape wrapped around a small stick
- Whistle
- Compass
- Pocket knife
- A three (3) day supply of all prescription drugs
- A few high-energy food bars
It is usually a series of two or three unfortunate events that contribute to a problem situation. In many times this occurs when you are outdoors and out of contact with someone to help you. For this reason, we recommend you always carry at least a small First Aid Kit and at least a small Emergency Kit whenever you are hiking or biking on trails. A simple wrong turn, a twisted ankle, a fall, combined with it getting darker quicker than you expected, can put you in a potentially dangerous situation.
Simple and easy to carry things like clothespins can be used to help secure the cover of your shelter; the sticks can be separated and used to tighten and secure a tourniquet; and even be used as kindling to start a fire.
Three blasts of a whistle means you have an emergency and should bring you help. A whistle can be used in any number of situations to obtain help and to allow others to find you.
Large plastic bags weigh next to nothing and can be easily carried on your person. These bags can be used to create an Emergency Shelter (see below), and be can used to keep you warm. If you are trapped out on a cold night, you can cut a hole in the bottom of the bag, and cut holes for your arms. Then you can slip on the bag and wear it as a shirt; be sure to place it directly against your skin. The bag will contain your body heat for the “central core” of your body, and kept your vital organs warm.
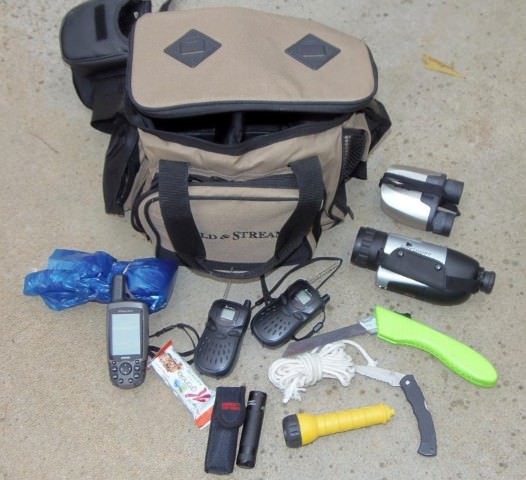
Examples of some emergency items, including a hand-held GPS unit, 2-way radios, binoculars, night vision scope, poncho, energy bar, two small flashlights, knife, collapsible saw, and some rope.
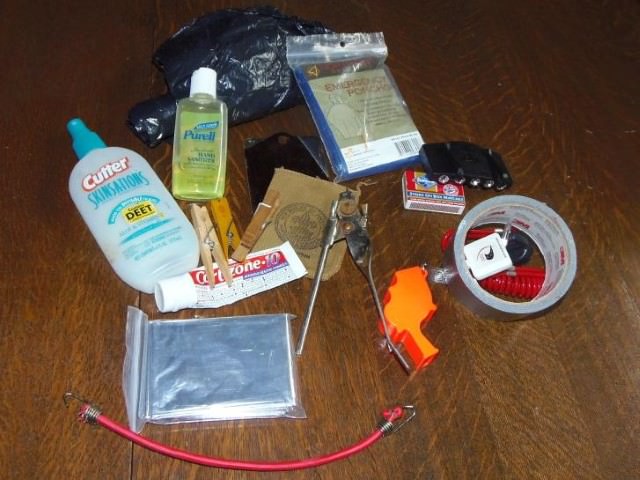
Other emergency items you should consider are shown above, they include: high efficiency blanket; duct tape; clothespins, whistle; bug repellant, anti-itch cream; mirror; matches, disinfectant; large plastic bag; etc.
Obtaining Water
Because you can go a lot longer without food than without water, it is important you always remain hydrated. Even being caught having to spend an unexpected night outdoors may require you to obtain water from a river or stream. In most cases, the water will not be safe to drink unless it is brought to a rolling boil, or treated with purification tablets.
It is NOT recommended to eat snow to stay hydrated when you are trapped outdoors, exposed to winter conditions. Eating the cold snow will lower your body temperature and increase your chance of hypothermia – a potentially fatal condition. (If you can heat the snow by some method, and capture the water, that is okay to drink.)
If necessary, clear plastic bags can be used to create both above ground and below ground stills. An above ground still requires you to place a lot of green leafy (non-poisonous) material in it. Place it on a sunny sloped area, with a small rock at the bottom. To make a below ground still, find a sunny area that may have contained water recently (such as a dry river bed or low area) and dig a hole that you can cover with your clear plastic bags (cut them open and use the duck-tape to put two together); ideally the hole should be about three feet in diameter, and about two feet deep. You can place some green leafy material around the sides if available. Place a small rock on the plastic so the plastic dips down like an upside-down cone to within a couple of inches of a container in the hole; the container to collect the water should be in the center of the hole directly under the rock. Use rocks or dirt to seal the perimeter of the plastic and to keep it from falling into the hole.
Emergency Shelter
- If you or someone in your party gets injured, or if you get lost (see below); you should know the basics of making a temporary shelter
- Most survival books have detailed information on the various methods you can use. You are encouraged to read such material for your general knowledge.
- A couple of basic things to consider:
- Use a poncho or any similar item to make a sun/rain covering
- Use a hiking stick, or fallen branch, as a support for the covering
- Make small segments of “rope” by using vines or similar items, and tightly twisting them together
- Use the “rope” to secure a branch/stick between two trees to attach a covering
- If you do not have a poncho, cut branches to form a skeleton of your shelter, attach branches with leaves to the skeleton
- Use rocks to hold the bottom of the covering in place
- A simple “floor” for the shelter can be a pile of leaves over a cleared area, and topped with a covering of any sort
- If expecting rain, place your cover in an area to avoid low spots or run-off; and consider make a small trench to divert run-off
- If expecting cold weather, gather kindling and wood for building a small fire; you can use your knife to shave a branch, and use the shaving as kindling to start your fire (cut several partial shavings in one or two branches, and use these branches as the ones to try to light first)
- If lost in a snow covered area, you might have to consider making a “snow cave”; snow is a good insulation against wind and even sub-freezing temperatures
- If you are lost while driving, it may be safer to find a safe place off the road to spend the night; be sure to crack a window for ventilation; if in cold weather, use newspapers or magazines to cover the inside of the windows to provide extra installation and be sure to cover your head to conserve body heat
Getting Lost
- Stay in one location; let others find you
- Whistle – three blasts
- Carry and use any communication device
- Mirror to flash for help; rule of three
- If necessary, build three small fires about 20 feet apart and put on leaves or similar material to cause three smoke lines in the air
- Upside-down American Flag is a universal distress signal
- If lost in a snow covered area, you might have to consider making a “snow cave”; snow is a good insulation against wind and even sub-freezing temperatures
- If have to leave the area, use markers to indicate the direction you are taking (make an arrow out of rocks or sticks; you can also place a small rock on top of a larger one, then place another smaller rock on the ground next to larger one to indicate your intended direction of travel)
- Walk in a straight line by lining up three items ahead of you; when you reach the first item, use the remaining two to find a third (periodically leave a marker of some sort; and mark any change in direction or which path you are taking if two paths intersect)
- Follow a river if possible; it may come to a road you can use to find help
Protection from Poisonous Plants, Animals, Insects & Spiders
Plants
- Avoid, i.e. know what poisonous plants look like (usually they have 3 leaves; poison ivy shown at right)
- Wear long pants and long shirt sleeves when hiking or biking on trails
- Wash yourself and your clothes as soon as possible
- Do not scratch or rub the infected area; wash your hands often
- Never put poisonous plants in your campfire (if you breathe in the fumes, it could be fatal)
Snakes
Snakes
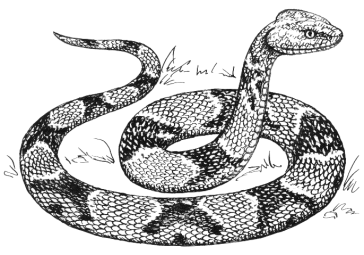
- Avoid, i.e. know what poisonous snakes look like (usually they have arrow shaped heads; e.g. copperhead pictured to above); make noise as you walk helps avoid snakes (they will want to get out of your way; they usually only attack when surprised or feel threatened).
- Wear long pants and high-top boots if an area where poisonous snakes have been known to be active (Note: if you find yourself in an area with poisonous snakes, use newspaper or any available material, and secure it around your lower legs, inside your pants just above your boots; to help prevent the snake’s fangs from piercing your skin.)
- If climbing rocks, look before you place your hand (snakes are cold blooded and like to warm themselves on sunny rocks)
- If bitten, get away from the snake to avoid multiple bites
- Take a picture of the snake if possible (use your cell phone’s camera)
- Loosen or remove any tight clothing, jewelry, etc. from around the bite area
- Wash the bite area with soap and water
- If bitten by a coral snake, put on a pressure type of bandage (or tightly wrap something) on an appendage to push blood towards the bite, i.e. away from the heart
- Do NOT cut or try to suck out the poison (either can cause more harm)
- Do NOT elevate the bite area; keep it lower than the heart if possible
- Get medical attention ASAP; call 911 immediately
Bear Encounter
- Never RUN, both Black and Brown (Grizzly) bears can run much faster than a human; running may well trigger an attack.
- If in bear territory, consider carrying in a very accessible place, Bear Deterrent Pepper Spray (do not keep it somewhere in your pack, it must be accessed quickly).
- If you see cubs, the very defensive mother is probably close by; leave the area as quickly as possible; never approach the cubs; and never feed any wild animal.
- If the bear is more than 100 yards away, he/she may not have detected you; in which case you should slowly move away from the bear.
- If the bear has detected you, talk to it in a calm voice and move your arms slowly (both actions to help the bear identify you as a human – in which case it might retreat); start walking away from the bear. Do NOT make direct eye contact.
- If the bear starts circling you, or begins acting aggressive, it may be preparing to attack. Wave your arms and make loud noises; be prepared to find a tree to climb. Note: Grizzlies can climb short distances up trees, and Black bears are excellent climbers; therefore you should be prepared to climb at least 10 yards (30 feet) up a tree to be safe. However, by climbing a tree, you should appear less of a threat to the bear and it may lose interest in pursuing you.
- If a bear charges, try throwing something to see if it will go after it and give you time to back away.
- If attacked by a Black bear, fight back; use your pepper spray; go for the eyes and kick other sensitive parts of their bodies.
- If a Grizzly attacks, try to dodge any contact; if you cannot and it is daylight, playing dead is your best option. (Grizzly attacks are usually defensive, so you can appear less threatening by playing dead; if you do play dead, and the bear leaves, remain still for at least 20 minutes as the bear may be watching you.) If attacked at night, your best option is to fight back.
Encounter with Mountain Lions or Similar Animals
- Never venture out alone in territories of such animals
- NEVER RUN, running may trigger an attack and these animals are fast runners
- Do not turn your back on such an animal; look directly in its eyes
- Make yourself appear as LARGE as possible; use your arms to hold up something above your head (if with a small child, place the child on your shoulders); never crouch or bend over in lion territory
- Show your teeth; make aggressive snarling sounds; try to back away slowly
- If it charges, use your hiking stick to stab the animal in the face
- If attacked, use pepper spray; NEVER play dead; use anything available (pocket knife, rocks, sticks, flashlight, etc.) as a weapon and fight back aggressively; go for the animals eyes and other sensitive parts of it body
Alligators
- Alligator attacks on humans are very rare
- Do not swim in waters where alligators may be present; check with locals
- If you are swimming in questionable waters, or tossed from a boat, do not splash the water as that may attract an alligator
- Do not dangle arms or legs from boats in waters with alligators
- Keep small children and pets away from the edge of ponds and waters where alligators may be present
- Do not throw anything at an alligator, and do not feed it
- A normal healthy person should be able to out run an alligator on land. Alligators cannot turn quickly on land so by making sharp turns while you run away may give you an advantage if the alligator is close to you
- Alligators do not like loud noises, so blow your whistle, bang pans together, scream, etc. to ward off an attack
Campfires
Enjoying a campfire is one of many pleasures associated with camping. Learn and practice building a fire so you can do so quickly in an emergency; and get one lit without the use of liquid starting fluid.
- Build your fire only in the allowed areas, and clear the area in and around your fire pit of all twigs, leaves and anything combustible (be sure to look overhead to ensure you are clear of all tree branches)
- Line your fire area with rocks to help contain sticks and logs that may fall as the fire burns; and you can use the rocks to support a grill for cooking if desired
- Use a piece of cloth, rope, dry leaves, or newspaper as a fire starter (you can also use wine corks that have been soaked in rubbing alcohol for 20 minutes as fire starters; prepare them before your trip and store in sealed container) Note: lint from your home clothes dryer works extremely well to start a fire
- Add in a “teepee” style, small, dry twigs; then larger twigs; then small branches; some larger branches; and finally some logs
- You can also use a knife to “shave” a dry branch to produce a number of small slices of wood that are excellent to get a fire started (make a few “partial” shaves in the branch so it looks like a small Christmas Tree, and place it on top of the shavings to really help your fire start; this is particularly useful when branches are wet)
- Do NOT use any living plant material, and never cut or remove live branches from trees (beside being illegal to do so in most campgrounds, this “green” plant material will not burn well, if at all)
- Use a collapsible camping saw for cutting DEAD branches found on the ground into suitable size for your fire; you only need to cut a 1/3 or so through the branch, then they can be snapped by placing the branch on a rock and carefully stepping on it
- Before you start your fire, be sure to have water (or sand) readily available to put out the fire
- Try not to use any liquid starting fluid, especially if you intend to cook on the fire (if you do use such fluid, NEVER apply it after the fire has started; the flame can travel up the liquid stream and ignite the contents of the can causing a very dangerous and potentially fatal situation)
- Use a match or fire starter device to light your fire from the side where the wind is coming, i.e. you want the wind to blow your flame to the center of the teepee
- A fire needs material to burn and oxygen; to help start a fire, gently fan the fire (if there is a lot of smoke, you may have the sticks too close together, use something to open up the material to let more oxygen in to reach the flame
Note: Whether in an emergency situation or not, you may want to have a campfire in wet conditions. One way to get dry wood for kindling and to get logs started is to split a log. Even a completely water soaked log will be dry on the inside. One of the easiest and safest ways to split a log is to use a “log splitter” (pictured above).
Note: You might want to consider bringing some logs with you when you go camping. This saves you the cost of purchasing firewood at the campground, and ensures you will have firewood for your fires. If you bring firewood, be sure to prepare it for the trip by cleaning it and storing it in a dry area for several days prior to packing. Be sure that the area in which you are traveling does not have a ban on transporting firewood. If any such ban is in effect, leave your firewood at home. You do not want to be responsible for bringing in wood that may contain bugs or disease to the native trees and plants in the area you will be camping.
Basic Knots
Tying Knots
Many camping books and pamphlets are available to illustrate how to tie a number of different knots, and the best knot to use for various applications. If you plan on spending a good bit of time outdoors, you are encouraged to learn as many knots as is reasonable for your intended activities. If you are going to participate at all in the outdoor, you should at least know how to tie the following:
- Square Knot – used to tie two pieces of rope together; hold an end in each hand; place the Right on the Bottom and loop it over the rope from the left hand; next take the rope that is now on the Right side, place it On Top of the other end and weave the end through the center hole – remember Right on the Bottom; Right on Top
- Two Half Hitches – used to tie a rope to a post or other object; loop the end of the rope around the post like a U; take the end over the main line and tuck the end in the space close to the post; wrap the end over the main line and tuck the end in the loop on the bottom; pull the knot tight
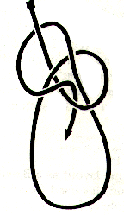
- Bowline – used to form a non-tightening loop in a rope; with the rope hanging straight down, make a small loop with the short end on top (allow at least a foot for the short end); with the short end, form another (larger) loop below the first loop; bring the end up from the bottom and pass it through the small loop; take the end and go around the straight part of the main rope; then take the end and place it through the small loop; finally tighten the knot (in an emergency you can form a large Bowline loop and toss it to someone who can place it around their body if you have to pull them up)
Vehicle Gets Stuck
- Let out air in tires if stuck in sand; then try to drive out
- If stuck in the cold, use newspapers or some other material to cover the windows and provide some degree of insulation
- If in an isolated area, it is usually best to stay with your vehicle and wait for help, rather than walking for help
Read More in Jeannette and Dan Dudek’s Travel Tips Safety Series
- Part 1: Emergency Situations – Emergency Preparation for Staying or Evacuating
- Part 3: Outdoor Safety Items – What Everyone Needs to Know About Outdoor Safety
- Travel Safe and Smart
- RVing and Firearms ~ You carry a fire extinguisher to stop a fire;so consider a hand gun to stop an invasion
Bio:
Although 100 miles from the ocean, Jeannette and Dan Dudek were without electric at their home in North Carolina for fourteen days after Hurricane Hugo ripped thought South Carolina and North Carolina in 1989. Jeannette and Danhave traveled extensively domestically and internationally; and have been to most U.S. states and Canadian provinces and about 30 countries.
In his business career Dan has had the opportunity to spend weeks on assignment in many overseas locations, and has learned to observe the “frame of reference” others have of culture and political ideologies. He has a private pilot’s license (now inactive), and as an Eagle Scout, he practices the scout motto to “Be Prepared” for all situations and confesses to being a person who likes “electronic toys”, especially those security related.
Dan became involved with amateur photography started when he was about ten years old, and continues to this day. As a hobby, Dan makes DVDs of pictures and video for his family and friends. Jeannette’s career has included teaching elementary school classes; as well as English classes for middle school students; she also as has been a business manager and accountant for several firms. Jeannette’s passion is gourmet cooking and hosting special gatherings for friends and family.
Besides international travel, Jeannette and Dan enjoy traveling North America in their RV, as well as handgun competitions, sailing, hunting, hiking, mountain biking and other outdoor sports.